What's on this page
- Before you start
- Step 1: Open your aperture wide
- Step 2: Raise your ISO wisely
- Step 3: Slow the shutter and stabilize
- Step 4: Shoot RAW
- Step 5: Focus in the dark
- Step 6: Meter for the highlights
- Step 7: Add or shape the available light
- Step 8: Denoise in post
- A worked example: one dim room, start to finish
- Common mistakes to avoid
- Troubleshooting the hardest low-light scenes
- Your low-light checklist
- The bottom line
Short answer: Shoot in low light by taking exposure away from automatic mode: open the aperture wide first, then raise ISO enough to keep a shutter speed fast enough to stay sharp, and steady the camera for anything static. Shoot RAW so you can lift shadows and fix color later, focus deliberately on an edge of contrast, meter to protect the highlights, add or shape whatever light you can, and finish with careful noise reduction.
Low light is where most cameras, and most photographers, quietly give up. The room goes dim, the automatic mode drops the shutter to a crawl, and the frames come back either dark and muddy or blurred into soft streaks. It feels like a limit of the gear, and sometimes a little of it is, but far more often low light is a settings problem with a settings answer. The camera you already own can shoot a clean, sharp frame in a candlelit room or a dark concert if you take the exposure decisions away from the automatic mode and make them yourself, in the right order.
This is a how-to, so it leans on the reference field notes rather than repeating them. The three settings you will balance here are the same ones covered in our exposure triangle field note, and if you want to set them all by hand while you work, our manual mode field note walks the sequence. The single biggest piece of gear that makes low light easier is a wide-aperture lens, which our best lens for low light field note covers in detail, and the sharpness habits that matter double in the dark run through our sharp photos field note. Price any glass you are tempted by with the upgrade budget planner before you assume the fix is a purchase.
Key takeaways
- Take the exposure away from the automatic mode: in low light it protects brightness by dropping the shutter until the frame blurs, which is exactly the wrong trade.
- Open the aperture first, then raise ISO to keep a fast enough shutter. A fast prime at f/1.8 gathers roughly ten times the light of a kit zoom at f/5.6, more than three stops.
- A slightly noisy but sharp photo beats a clean but blurred one every time, so do not fear ISO 3200 or 6400 when the alternative is motion blur.
- Shoot RAW in the dark: it preserves the range to lift shadows, fix mixed-light white balance, and denoise without the banding a JPEG would show.
- Focus is the quiet failure of low light: give autofocus an edge of contrast to lock onto, or switch to magnified manual focus when it hunts.
Before you start
Shooting in low light is a moderate-difficulty skill that rewards a little deliberate practice, and none of the core fixes require new equipment. Difficulty is beginner to intermediate, and a productive first session runs about an hour spent in one dim room, changing a single setting at a time and watching what happens to brightness, sharpness, and noise. The point is to build the priority order into a habit so that when the light drops on a real shot, you already know which dial to reach for first.
Here is the short list of what helps, in rough order of how much difference each one makes:
- A camera you can control, meaning one where you can set or at least influence aperture, shutter speed, and ISO, and choose the focus point. Nearly every interchangeable-lens camera qualifies, along with many advanced compacts and manual phone apps.
- The widest-aperture lens you own. A fast prime around f/1.8 or f/1.4 is the ideal low-light tool, but a kit zoom at f/3.5 to f/5.6 teaches every setting here perfectly well, just with more ISO to compensate.
- Something to steady the camera: a tripod, a beanbag, a railing, a doorframe, or even a table. For static scenes this buys you the slow shutter that a dark room wants.
- RAW capture turned on, because low-light files need the most editing headroom and RAW preserves it. Switch it on in the menu before you shoot rather than wishing you had afterward.
- A little patience and a willingness to review at full size. Low-light problems, noise and softness especially, hide on the small rear screen and only show when you zoom in, so check your frames properly as you go.
With that gathered, the eight settings and fixes below take you from dark, grainy frames to clean, sharp ones you can repeat. Run your own kit through the upgrade budget planner first, because most low-light problems are solved with settings you already have, not gear you do not.
Step 1: Open your aperture wide
The first and largest lever in low light is the aperture, the adjustable opening inside the lens, because it controls how much light reaches the sensor before you touch anything electronic. A wider opening, meaning a lower f-number, gathers more light, and in the dark that gathered light is the whole game. So the first move in any dim scene is to open the aperture as wide as your lens allows: f/1.8 or f/1.4 on a fast prime, or the widest your kit zoom offers at whatever focal length you are using, often f/3.5 at the wide end and f/5.6 zoomed in.
The difference is not small. Because light-gathering scales with the square of the aperture ratio, an f/1.8 prime pulls in roughly ten times the light of a kit zoom at f/5.6, which is more than three stops. That means the fast lens can use an ISO three stops lower, or a shutter three stops faster, for the same brightness, and either one is a huge gain in the dark. Our best lens for low light field note works through exactly how much each aperture buys, and the prime versus zoom field note explains why primes open so much wider than zooms.
The watch-out is depth of field. A wide aperture gives a very shallow zone of sharpness, so wide open at f/1.4 the focus is razor thin and a small miss leaves the eyes soft while the eyelashes are sharp. For a single subject that thin slice is often what you want, but for a group in low light you may need to stop back to f/2.8 to keep several faces sharp, and pay for that lost light with a higher ISO. Open up first to see how much light you have to work with, then close down only as far as the depth of field forces you.
Step 2: Raise your ISO wisely
With the aperture open, the next lever is ISO, the setting that amplifies the sensor’s signal to brighten a dark exposure. In low light you will almost always need to raise it, and the skill is doing so wisely: high enough to keep a shutter fast enough to stay sharp, but no higher than the scene actually demands. Raising ISO is not free, because it also amplifies noise, the grainy speckle and colored blotches that muddy fine detail, so it is the setting you lift last and only as far as you must.
The instinct many beginners have is to keep ISO low to avoid that noise, and in the dark that instinct backfires. Refusing to raise ISO forces the camera or you to slow the shutter instead, and a shutter too slow to hand-hold blurs the whole frame. That is the wrong trade, because a slightly noisy photo is perfectly usable and cleans up well, while a blurred one is unrecoverable. So the priority is clear: protect the shutter speed first, keep the aperture wide, and let ISO climb to whatever value balances the exposure at that fast shutter. An illustrative dim-room combination might land near ISO 3200, and a darker event might need ISO 6400 or more.
Do not fear those numbers. Modern cameras handle high ISO far better than most beginners assume, and a clean-looking ISO 6400 frame is well within reach of current gear, especially once you denoise a RAW file in editing. The genuine caveat is that noise does climb with ISO, and every camera has a point where the image starts to fall apart, so the real fix for chronic noise is gathering more light optically with a wider aperture rather than pushing ISO ever higher. Raise ISO as the scene demands, but treat a fast lens as the long-term answer, as our field note on what to upgrade first discusses. Files that genuinely fall apart at the ISO your rooms require are one of the few walls only a body fixes, and our note on how to upgrade your camera walks how to be sure that is your case. Set your own starting ISO with the companion above.
Step 3: Slow the shutter and stabilize
Shutter speed is the third corner of the exposure, and in low light it is the one that quietly ruins more frames than any other, because a dim scene tempts every setting toward a shutter too slow to stay sharp. The shutter does two jobs: it sets how long light is gathered, and it decides whether motion, yours or the subject’s, is frozen or smeared. The floor for hand-holding is the reciprocal rule, hold at a shutter at least as fast as one over your focal length, so a 35mm lens wants about 1/40 of a second or faster and a 200mm lens wants 1/200 or faster. Our sharp photos field note works this rule in full.
In the dark you often want to go slower than that floor to gather more light, and that is fine only if you remove your hands from the equation. For a static scene, put the camera on a tripod or brace it hard against a wall, a railing, or a table, and then you can use a shutter of a full second or several seconds at a low ISO for a clean, bright file. This is exactly how night cityscapes and dim interiors are shot: slow shutter, steady support, low ISO. Add a two-second self-timer or a remote release so the act of pressing the button does not shake the camera at the moment of exposure.
The hard caveat is that a slow shutter only works when nothing in the frame moves. A tripod steadies your hands but does nothing for a walking person, a swaying candle flame, or a musician on stage, all of whom will smear across a long exposure no matter how solid the legs are. So the decision splits by subject: for a still scene, slow the shutter and stabilize for the cleanest file, and for a moving subject, keep the shutter fast, an illustrative 1/250 or more, and pay for it with a wide aperture and a high ISO instead. Decide what motion should look like first, then set the shutter to deliver it.
Step 4: Shoot RAW
Of all the settings that matter in low light, the format you record in is the one people forget, and it is one of the most valuable. Shooting RAW, the camera’s uncompressed sensor data rather than a finished JPEG, preserves the maximum room to rescue a difficult dark frame later, and low-light frames need that rescue more than any other kind. A RAW file keeps the full range of tones and color the sensor captured, so on a big screen you can lift the shadows, recover a highlight, correct color, and denoise, all without the file falling apart.
The reason this matters so much in the dark comes down to three problems RAW solves. First, shadows: a dim scene is mostly shadow, and lifting shadows in a compressed JPEG produces ugly banding and blotches, while a RAW file lifts cleanly. Second, white balance: indoor and night scenes are full of mixed and colored light, warm tungsten lamps beside cool screens beside orange streetlights, and the camera’s automatic white balance often guesses wrong. RAW lets you set white balance perfectly after the fact with no quality loss, where a JPEG bakes the wrong color in. Third, noise: RAW gives editing software the full data it needs to denoise well, and modern noise reduction on a RAW file is far better than anything the camera does in the moment.
The cost of RAW is real but small: the files are larger, so you need more card and drive space, and every frame requires an editing step before it is shareable, since RAW is not a finished image. That editing step is exactly where low-light photos are won, though, so it is a feature rather than a chore. If you are new to it, shoot RAW plus JPEG so you have a ready image and the RAW safety net together. The one thing to avoid is shooting JPEG only in a hard scene and discovering later that the latitude you needed was thrown away in the camera. Turn RAW on in the menu before the light drops.
Step 5: Focus in the dark
Focus is the quiet failure of low-light photography, because autofocus systems find contrast, and darkness is the absence of the contrast they need. You can nail every exposure setting and still come home with soft frames if the camera hunted back and forth and locked on nothing, so focusing deliberately is its own step in the dark. The first move is to help the autofocus rather than fight it: aim your focus point at an edge where light meets dark, the rim of a lamp, a bright highlight, the edge of a face against a darker background, because that boundary is the contrast the system can grab.
Use single-point autofocus for precision so you decide exactly where the sharpness falls rather than letting the camera guess in a dim, low-contrast scene. Many cameras also have an autofocus assist lamp, a small light that briefly illuminates a close subject to help the system lock, which is useful for people nearby though it does nothing for a distant one. Back-button focus, moving the focus action onto a rear thumb button, is especially valuable in low light because it lets you lock focus once on a contrasty edge and then shoot several frames without the camera refocusing and hunting each time you press the shutter.
When autofocus simply cannot cope, and in true darkness it sometimes cannot, take focus into your own hands. Switch the lens or camera to manual focus, turn on the magnified live view that enlarges part of the scene on the rear screen, and turn the focus ring slowly until the detail snaps sharp, using any focus-peaking outline your camera offers to confirm it. For a fixed scene like a night landscape you can focus once manually and leave it. The watch-out at wide apertures is that depth of field is so thin that even a tiny focus miss shows, so confirm the lock at full magnification before you commit, because focus is the one thing you cannot fix afterward.
Step 6: Meter for the highlights
Metering is how the camera decides what counts as a correct exposure, and low-light scenes fool it more than bright ones, so understanding what to meter for keeps your frames from coming back muddy or blown out. A dark scene confuses an averaging meter, which tries to make everything a middle gray and often overexposes the frame by brightening the shadows too far, washing out the mood and, worse, clipping the few bright highlights past the point of recovery. A blown highlight, a light source or a bright face pushed to pure white, carries no detail and cannot be brought back, while a dark shadow usually can be lifted from a RAW file.
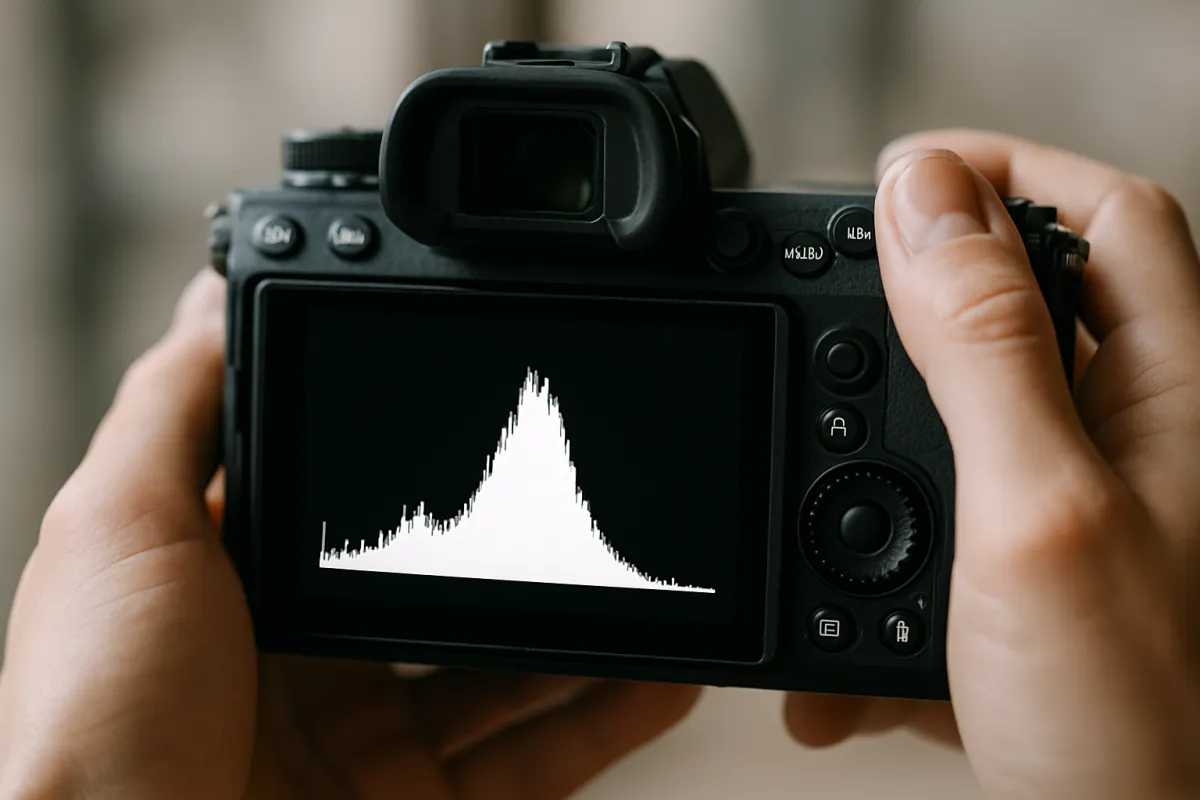
So in high-contrast low light, the safer instinct is to meter for the highlights, meaning expose so the brightest important part of the scene keeps its detail and let the shadows fall dark, since you can lift shadows later but not recover a blown highlight. The tool that makes this reliable is the histogram, the small graph on your rear screen that shows the spread of tones from dark on the left to bright on the right. Watch that the right edge, the highlights, does not pile up hard against the wall, which signals clipping, and use your camera’s highlight warning, the blinking overexposed areas, to catch it in the field.
There is a competing idea worth knowing, exposing to the right, which says push the exposure as bright as you can without clipping highlights because a brighter capture carries less visible noise, then darken it in editing. That works well and is not in conflict with protecting highlights: both say do not clip the bright end. The practical routine that satisfies both is to raise exposure until the histogram approaches the right edge but does not slam into it, then hold there. Use exposure compensation in an automatic or semi-automatic mode to dial the whole exposure brighter or darker against what the meter suggests, and check the histogram rather than trusting the rear screen, which looks deceptively bright in a dark room.
Step 7: Add or shape the available light
The settings so far all react to the light in the room, but the most powerful low-light move is sometimes to change that light rather than only chasing it with the exposure. You do not always need a flash or a studio to do this, and often a small amount of added or redirected light transforms a frame that ISO alone would leave grainy. Start by using what is already there more deliberately: move your subject toward the largest, softest light source in the room, a big window, a bright lamp, an open doorway, because moving a person a few steps into better light does more than three stops of ISO ever could.
Shaping matters as much as adding. Position the subject so the available light falls across them at a flattering angle rather than flat on or harshly from above, and turn them toward the window so the light wraps across the face. A plain white wall, a sheet, or even a piece of paper can bounce a lamp’s light back into the shadows to soften them and lift detail. If you do add light, you have options beyond the harsh built-in flash: a small continuous LED panel lets you see the effect as you shape it, and an external flash bounced off a ceiling or wall spreads into soft, natural-looking light instead of the flat glare of direct flash. Our portrait field note works through flattering light placement in depth.
The watch-out is to keep added light believable and to respect the setting. A dim, moody room shot to look like daylight loses the atmosphere that made it worth photographing, so add just enough light to hold detail and keep the mood, rather than flooding the scene. Some places, concerts, ceremonies, museums, ban flash entirely, and there a fast lens and a high ISO are your only tools, which is why the earlier steps matter. When you can influence the light, though, a single well-placed bounce or a subject moved into a window is the highest-leverage fix in this whole field note, because it reduces how hard every other setting has to work.

Step 8: Denoise in post
The final fix happens after the shutter, in editing, where careful noise reduction turns a grainy low-light RAW file into a clean image. It helps to understand what noise is: the grainy luminance speckle and the colored blotches that appear when the sensor’s signal is amplified at high ISO or a dark exposure is lifted. Some noise is unavoidable in low light, but modern software removes a remarkable amount of it while keeping detail, especially when you gave it a good RAW file and a reasonably bright exposure to start with. Denoising is the polish that makes an ISO 6400 frame look clean, not the place you rescue a badly exposed one.
The technique balances two controls. Luminance noise reduction smooths the grainy brightness speckle, but pushed too far it also smears fine detail and turns textures like skin, hair, and foliage into a waxy blur, so raise it until the grain is acceptable and stop before the detail goes soft. Color noise reduction removes the colored blotches and has far fewer downsides, so you can usually apply it more generously. View the image at 100 percent, its actual pixels, while you adjust, because noise judged on a small zoomed-out preview is invisible and tempts you to underdo or overdo it. AI-based denoise tools, now built into most major editors, do this balancing better than manual sliders and are worth learning for serious low-light work.
Two caveats finish the fix. First, order matters: reduce noise before you sharpen, because sharpening amplifies whatever noise remains, and sharpening a noisy file first makes the grain worse. A gentle, correct sharpening after denoising restores the bite that noise reduction softened, as our sharp photos field note covers. Second, remember that denoising cannot add detail the exposure never captured, so it is not a substitute for the seven steps before it, only the finishing touch on a frame you already exposed and focused well. The best noise reduction remains a wider aperture and a properly bright exposure in the first place. Denoise with a light hand, and a dim scene comes back clean.
Stops of light each aperture gains over a kit zoom at f/5.6
Illustrative light-gathering advantage of opening up, in stops, compared with a typical kit zoom stuck at f/5.6. Each stop doubles the light, so more stops means a lower ISO or a faster shutter for the same brightness. Computed from the aperture ratio, not a measured test.
Opening from f/5.6 to f/1.8 gains more than three stops, roughly ten times the light, which is why a fast prime transforms a dim room. Each stop you gain in aperture is a stop you do not have to buy with noisy ISO. Tune the trade to your own lens with the companion above.
A worked example: one dim room, start to finish
Theory into practice: here is a single realistic scene run through the eight fixes, with illustrative settings, so the sequence is concrete rather than abstract. The scene is a friend sitting at a table in a warmly lit living room in the evening, one lamp and a window with the last of the dusk light, and your first automatic frame came back dark and slightly blurred. Before changing anything, you diagnose. The whole frame is soft, which points at a slow shutter, and when you check the data the camera chose 1/15 of a second to reach brightness, well below what you can hand-hold. There is the culprit.
Open the aperture. You have a 35mm f/1.8 prime, so you open it to f/1.8, gathering more than three stops over a kit zoom immediately. Set the shutter. The reciprocal floor for 35mm is about 1/40, and your friend may shift slightly, so you aim for 1/60 to stay sharp. Raise ISO to feed it. At f/1.8 and 1/60 in that lamp light, the meter balances near ISO 3200, an easy value on a modern camera. Your working trio is f/1.8, 1/60, ISO 3200. Shoot RAW. You confirm RAW is on so you can fix the warm lamp color and denoise later.
Focus in the dark. Autofocus hunts on the dim face, so you place the single point on the lit edge of the cheek where light meets shadow, it locks, and you leave back-button focus holding it. Meter for the highlights. You check the histogram, nudge exposure compensation down a third of a stop so the bright lamp and the window keep detail, and let the shadows sit dark. Shape the light. You ask your friend to turn toward the window so the dusk light wraps across the face, and you slide a white napkin holder aside so a plain wall bounces the lamp back into the shadow side. Denoise in post. On the computer you set white balance to neutralize the orange lamp, apply moderate luminance and generous color noise reduction at 100 percent, then a light sharpening. One dark, blurred snapshot becomes a clean, warm, sharp portrait: f/1.8 to gather light, 1/60 to stay sharp, ISO 3200 to feed it, focused on a contrasty edge, metered to protect the highlights, shaped by the window, and denoised at the end. Run your own room’s kit through the upgrade budget planner before assuming you need faster glass.
Where a clean low-light frame comes from
Illustrative share of the work that each group of fixes contributes to a clean, sharp low-light photo. The three parts sum to the whole result, so no single setting does it alone.
Most of a clean low-light frame is won by gathering light optically and keeping the shutter fast enough to stay sharp. Focus, metering, and denoising refine a frame those two already made possible. Adjust the split to your own shooting with the companion above.
Common mistakes to avoid
Most low-light frames fail in one of a handful of predictable ways, and knowing them in advance is the fastest route to clean, sharp photos. These are the pitfalls that come up again and again:
- Leaving the camera in a fully automatic mode. In the dark, automatic modes protect brightness by dropping the shutter until the frame blurs, which is the wrong trade. Take control of the exposure so you decide the shutter, not the camera.
- Refusing to raise ISO. Keeping ISO low to avoid noise forces a slow shutter that blurs everything, trading recoverable noise for unrecoverable blur. Protect the shutter and let ISO climb to whatever the scene needs.
- Shooting JPEG in a hard scene. A compressed JPEG throws away the shadow, color, and noise latitude that low-light frames depend on. Shoot RAW so you can rescue the file later.
- Trusting autofocus to find nothing. Letting the camera hunt in a dark, low-contrast scene locks on nothing and comes back soft. Aim the point at a contrasty edge or switch to magnified manual focus.
- Blowing the highlights. Overexposing to lift the mood clips light sources and bright faces past recovery. Watch the histogram and highlight warning, and expose to protect the bright end.
- Overdoing noise reduction. Cranking luminance noise reduction smears skin, hair, and texture into a waxy blur that looks worse than grain. Denoise at 100 percent with a light hand, and keep color noise reduction stronger than luminance.
Troubleshooting the hardest low-light scenes
Real scenes do not always cooperate, so here is how to handle the situations that fight you. What if your subject is moving and the room is dark, the hardest low-light case of all? You cannot slow the shutter, because motion will smear, so you spend everything else: open the aperture to its widest, raise ISO high, an illustrative 6400 or beyond, and keep the shutter fast enough to freeze the motion, an illustrative 1/250 for a person indoors. Accept the noise and clean it up later, because a sharp noisy frame of a moving subject is the only kind you can get, and a fast lens, covered in our best lens for low light field note, is what makes it possible.
What if flash is banned, at a concert, a ceremony, or a museum? Then the earlier steps are your entire toolkit: the widest aperture you own, the highest usable ISO, a shutter just fast enough for the subject, focus locked on a stage light or a contrasty edge, and heavy denoising afterward. This is precisely the scenario a fast prime is built for, and it is why photographers who shoot events invest in fast glass rather than relying on a body alone. Brace against a wall or a seat back to squeeze out a slower shutter if the subject holds still between movements.
What if the whole frame comes back with an ugly orange or green color cast? That is a white balance problem from mixed or artificial light, and the fix is twofold: shoot RAW so you can set white balance perfectly afterward with no quality loss, and in the field set a specific white balance preset, tungsten for warm lamps, rather than trusting automatic. What if noise is still overwhelming even after denoising? Then the exposure was probably too dark to begin with, so lifting it in editing amplified the noise. Next time expose brighter, pushing the histogram toward the right without clipping highlights, because a properly bright capture carries far less visible noise than a dark frame rescued later. And if the noise ceiling is a constant limit on your camera, a wider-aperture lens is the honest fix, as our note on what to upgrade first explains.
Your low-light checklist
Save this and run down it the next time the light drops, or before you shoot anything in a dim room:
- Take the exposure off full automatic so you, not the camera, choose the shutter speed.
- Open the aperture as wide as the lens allows, then close down only as far as depth of field forces you.
- Protect the shutter speed: at least one over your focal length for a still subject, an illustrative 1/250 or faster for a moving one.
- Raise ISO to balance the exposure at that fast shutter, and do not fear an illustrative 3200 or 6400 when the alternative is blur.
- For a static scene, slow the shutter and stabilize on a tripod or firm brace at a low ISO instead, with a self-timer or remote.
- Shoot RAW so you can lift shadows, fix mixed-light white balance, and denoise without banding.
- Focus deliberately: aim the single point at a contrasty edge, use the autofocus assist lamp, or switch to magnified manual focus.
- Meter to protect the highlights, watch the histogram and highlight warning, and expose bright without clipping the bright end.
- Move the subject into the softest available light or add a bounced or continuous light before you push ISO higher.
- Denoise before you sharpen, at 100 percent with a light hand, keeping color noise reduction stronger than luminance.
The bottom line
Shooting in low light is not a matter of luck or of owning the most expensive camera; it comes from a short, repeatable list of settings and fixes worked in the right order. Take the exposure away from the automatic mode, which in the dark drops the shutter until the frame blurs, and make the three exposure decisions yourself: open the aperture wide to gather light, keep the shutter fast enough to stay sharp, and raise ISO to feed that combination, accepting a little noise as the price of a sharp, bright frame. Shoot RAW so the difficult file can be rescued, focus deliberately because autofocus struggles where there is no contrast, meter to protect the highlights rather than blow them, shape or add the available light before you reach for more ISO, and finish with careful noise reduction at the end. The single most important habit is protecting the shutter speed, because a slow shutter causes more low-light failures than anything else, and the single most freeing realization is that almost every fix here uses gear you already own. Diagnose the dark frame before you fix it, work the list in order, and the camera in your hands will start returning the clean, sharp low-light photos you thought it could not. Price any faster glass you are still tempted by in the upgrade budget planner, then go shoot something in a dim room and keep the cleanest frame.
This field note teaches a shooting workflow, not a product: no brand paid for a placement and none is named on purpose, only settings, ratios, and techniques that hold across every camera system. Every aperture, shutter, ISO, and dollar figure here is an illustrative starting point rather than a fixed rule, because the combination that produces a clean low-light frame changes with your lens, your sensor, the amount of light, and the subject in front of you. The numbers describe standard photographic technique, not a measured test of any specific camera or lens, so treat them as a place to begin, check your own frames at full size, and let the result on screen, not any writer’s recipe, decide your final settings.
Frequently asked questions
What camera settings are best for low light?
There is no single magic set of numbers, because the right settings change with your lens, your camera, and how dark the scene actually is, but the priorities are consistent. Open the aperture as wide as the lens allows to gather the most light, which for a fast prime means around f/1.8 or f/1.4. Keep the shutter fast enough to stay sharp, at least one over your focal length for a still subject and faster for anything moving. Then raise ISO to whatever value balances the exposure, accepting some noise as the price of a sharp, bright frame. An illustrative starting point in a dim room might be f/1.8, 1/60 of a second, and ISO 3200, but you meter and adjust from there rather than treating those as fixed.
What ISO should I use in low light?
Use the lowest ISO that still lets you keep a fast enough shutter and a wide enough aperture, then let it climb as high as the scene demands. In a dim room that might be an illustrative ISO 3200 or 6400, and at a dark event it might be higher still. The instinct to keep ISO low to avoid noise is understandable, but it backfires when it forces a shutter so slow that the whole frame blurs, because a slightly noisy photo is usable while a blurred one is not. Modern cameras handle high ISO far better than most beginners expect, so do not fear ISO 6400 when the alternative is motion blur. The real long-term fix for noise is gathering more light optically with a fast lens, not refusing to raise ISO.
Why are my low-light photos blurry?
Almost always because the shutter speed dropped too low as the camera or your own settings tried to brighten a dark scene, and a slow shutter records every tiny movement of your hands or your subject as a smear. In dim light an automatic mode will happily choose 1/15 or 1/8 of a second to reach a correct exposure, well below the speed you can hand-hold, so the frame looks soft even though focus was fine. The fix is to protect the shutter speed first, at least one over your focal length, then open the aperture wide and raise ISO to reach a proper exposure at that faster shutter. If you must use a slow shutter for a static scene, put the camera on a tripod or brace it hard so your hands are out of the equation.
What is the best shutter speed for low light?
Fast enough to stay sharp, which is a floor set by your lens and your subject rather than a single best number. For a still subject held by hand, clear the reciprocal rule of at least one over your focal length, so a 35mm lens wants about 1/40 or faster and you round up for margin. For a moving subject you need much faster, an illustrative 1/250 for a person walking indoors and more for anything quicker, which is exactly what makes moving subjects the hardest low-light shots. If the subject holds still and the camera is on a tripod, you can use a shutter of a second or several seconds to gather light at a low ISO, since there is no hand shake to worry about. Match the shutter to the motion first, then feed it light with aperture and ISO.
Should I shoot RAW in low light?
Yes, more than in almost any other situation, because low-light files need the most editing help and RAW preserves the most room to give it. A RAW file keeps the full range of tones and color the sensor captured, so you can lift shadows, correct a warped white balance from mixed indoor lighting, and apply strong noise reduction without the harsh banding and blotches a compressed JPEG would show. The camera's in-body JPEG processing bakes in its own noise reduction and white balance, which often smears fine detail and gets the color wrong under artificial light. Shooting RAW means you make those calls later on a big screen with better tools. The cost is larger files and a required editing step, which in dim light is well worth paying.
How do I focus in the dark?
Give the autofocus system something with contrast to lock onto, or take focus into your own hands. Aim the focus point at an edge where light meets dark, the rim of a lamp, the edge of a face against a darker background, or a bright highlight, because autofocus finds contrast, not darkness. Many cameras have an autofocus assist lamp or let you use single-point autofocus for precision in dim light. When autofocus simply hunts and fails, switch to manual focus, use the magnified live view to enlarge the scene on the screen, and turn the focus ring until the detail snaps sharp. Back-button focus helps too, because it lets you lock focus once and keep it while you recompose and shoot several frames without the camera refocusing every time.
Do I need a fast lens to shoot in low light?
You do not strictly need one, but a fast lens is the single biggest thing that makes low light easier, because a wide maximum aperture gathers far more light than a kit zoom can. A fast prime at f/1.8 pulls in roughly ten times the light of a kit zoom at f/5.6, which is more than three stops, so it lets you keep a lower ISO and a faster shutter in the same dark room. You can absolutely shoot in low light with a kit lens by raising ISO further and steadying the camera, and modern high-ISO performance makes that more viable than it used to be. But if a real share of your photos happen indoors or at night, a fast prime is the upgrade that helps most, as our field note on the best lens for low light explains in full.
How do I reduce noise in low-light photos?
Gather more light in the first place, then clean up what noise remains carefully in editing. The best noise reduction is a wider aperture and a lower ISO, so open the lens up and expose as brightly as you can without clipping the highlights, since a properly bright exposure carries less visible noise than a dark frame lifted later. For the noise that is still there, shoot RAW and apply your editor's noise reduction, balancing luminance noise reduction, which smooths the grainy speckle, against a loss of fine detail, and color noise reduction, which removes colored blotches with little downside. Modern software, including AI-based denoise tools, does this remarkably well. Reduce noise before you sharpen, because sharpening amplifies whatever noise is left, and use a lighter hand than you think you need.